Custom Hair Systems > Custom Base Fitting Guide
MAKE A SEND-IN TEMPLATE
step 1 |
Tear off a piece of 12 wide clear plastic wrap that is long enough to stretch all the way around your head and tie it in a knot under your chin. Spray a little water on your scalp first, so that the plastic wrap fits very tightly. After pressing the wrap tightly to your head, use strips of clear household tape (not wide packing/shipping tape) to contour the head shape. Beginning at your forehead, place strips of the transparent tape over the plastic wrap at the side edges of your bald area and work your way inward with more tape strips. |
step 2 |
Once you have a complete layer of tape running front-to-back, place another layer of tape over the first layer, going from side-to-side. Apply three layers of tape two layers front-to-back and one side-to-side. The tape will lock the plastic wrap into a permanent, transparent mold (template) of your scalp. |
step 3 |
The location of your original, natural hairline can only be determined accurately by doing the following: Raise your eyebrows as though you are surprised. The skin on your forehead will wrinkle, but the skin on your scalp will stay smooth. The point where the wrinkles end and smooth skin begins is your natural hairline. Starting at your hairline, use a permanent marker to draw an outline of the area the base will cover. This will be the shape of your hairpiece base. After the entire outer perimeter is drawn, draw arrows indicating the direction you intend to comb your hair. If you desire a part, draw a line from a point at the crown straight down to your hairline. Make sure to mark the letter F clearly at the front of the template and the letter B at the back. Write your name on the template as well. |
step 4 |
After you have finished marking the tape template, add one more layer of tape (now four) to seal in the markings. After your mold is complete, cut away the excess plastic wrap along the outer perimeter line. Please cut at least 2 locks of your hair and tape them to a sheet of paper with your name on it and indicate what parts of your head they are from. This will help us match your natural color accurately. If you can provide your color code #, this step is not necessary. |
Place Your Order Now!
ORDERING WITHOUT MAKING A TEMPLATE
Determining your front-to-back measurement:
- A good way to determine where your scalp begins is to raise your eyebrows and furrow your brow. The point where your forehead stops wrinkling is where your scalp begins. Your hairline should begin ½ ¾ above this point.
- Measure from that point over the top of your head to the point in back where your recession area ends and your natural hair begins.
Determining your left-to-right measurement:
Measure from the point where your recession begins on one side of your head (above the ear) over the very top of your head to the same point on the other side of your head.
Place Your Order Now!
USING AN EXISTING HAIRPIECE AS A TEMPLATE
You can also use an existing hairpiece as a template. Simply ship the piece
to me and I will have the base size and shape duplicated. The template piece
will be returned to when the new hairpiece is shipped.
Please note: When shipping an existing piece as a template, please shampoo the piece and remove all adhesives before shipping! There is an additional $40 charge for unwashed pieces.
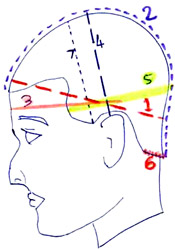
Please note: a template is NOT recommended for a full cap; instead, please refer to the diagram below for instructions on how to measure for a full cap. You will be asked for these 7 measurements in the store when ordering a full cap.
Measurements for your Full Cap (wig)
- Head Circumference
- From front hairline center to back of neck hairline center
- From ear to ear around the forehead (above eyebrows)
- From ear to ear over the top of the head
- From temple to temple around the back of the head
- Width of neck hairline at the back
- From temple to temple over the head
|
 |
| To view/print a PDF version of the above diagram: |
LEFT click here |
| To save a PDF version of the above diagram: |
RIGHT click here and choose "Save Target As" (Mac users, Option + click) |
Place Your Order Now!
|